|
A Chrome QR trick, AI image upgrades, and the study app that earned me a cool-dad point. ͏ ͏ ͏ ͏ ͏ ͏ ͏ ͏ ͏ ͏ ͏ ͏ ͏ ͏ ͏ ͏ ͏ ͏ ͏ ͏ ͏ ͏ ͏ ͏ ͏ ͏ ͏ ͏ ͏ ͏ ͏ ͏ ͏ ͏ ͏ ͏ ͏ ͏ ͏ ͏ ͏ ͏ ͏ ͏ ͏ ͏ ͏ ͏ ͏ ͏ ͏ ͏ ͏ ͏ ͏ ͏ ͏ ͏ ͏ ͏ ͏ ͏ ͏ ͏ ͏ ͏ ͏ ͏ ͏ ͏ ͏ ͏ ͏ ͏ ͏ ͏ ͏ ͏ ͏ ͏ ͏ ͏ ͏ ͏ ͏ ͏ ͏ ͏ ͏ ͏ ͏ ͏ ͏ ͏ ͏ ͏ ͏ ͏ ͏ ͏ ͏ ͏ ͏ ͏ ͏ ͏ ͏ ͏ ͏ ͏ ͏ ͏ ͏ ͏ ͏ ͏ ͏ ͏ ͏ ͏ ͏ ͏ ͏ ͏ ͏ ͏ ͏ ͏ ͏ ͏ ͏ ͏ ͏ ͏ ͏ ͏ ͏ ͏ ͏ ͏ ͏ ͏ ͏ ͏ ͏ ͏ ͏ ͏ ͏ ͏ ͏ ͏ ͏ ͏ ͏ ͏ ͏ ͏ ͏ ͏ ͏ ͏ ͏ ͏ ͏ ͏ ͏ ͏ ͏ ͏ ͏ ͏ ͏ ͏ ͏ ͏ ͏ ͏ ͏ ͏ ͏ ͏ ͏ ͏ ͏ ͏ ͏ ͏ ͏ ͏ ͏ ͏ ͏ ͏ ͏ ͏ ͏ ͏ ͏ ͏ ͏ ͏ ͏ ͏ ͏ ͏ ͏ ͏ ͏ ͏ ͏ ͏ ͏ ͏ ͏ ͏ ͏ ͏ ͏ ͏ ͏ ͏ ͏ ͏ ͏ ͏ ͏ ͏ ͏ ͏ ͏ ͏ ͏ ͏ ͏ ͏ ͏ ͏ ͏ ͏ ͏ ͏ ͏ ͏ ͏ ͏ ͏ ͏ ͏ ͏ ͏ ͏ ͏ ͏ ͏
|
Issue 55 • March 18, 2026
|
|
Today I’m in Grand Rapids, Michigan for the 50th annual MACUL Conference! As a featured speaker, I have the pleasure of presenting a workshop and six breakout sessions. My workshop focuses on vibe coding. In two hours, educators go through a design dash where they build tools, apps, and games with AI. My breakout sessions cover a variety of topics, including exit tickets, Google Forms, teaching with AI, brain breaks, and 3D printing. A few of the tricks and tools from those sessions show up in this issue.
|
|
I’ve been presenting at conferences and schools for 25 years, and I’m always perfecting my craft. One way I stay grounded is by staying close to the classroom. A few years ago I returned to teaching 5th grade, and now I sub and co-teach so I can keep working with classrooms and students. When I present, I try to model good teaching and model the tools and strategies I’m sharing. If something should be hands-on, I make it hands-on. If participation will help people learn, I invite the audience to jump in. After many of my presentations, even seasoned presenters ask about how the session was delivered. They enjoyed the content, but they’re curious about the little choices that keep everything running smoothly. Over the years I’ve developed a few habits that help: Switch quickly between slides and websites so there’s no downtime. Screen-record demos so I can smoothly talk through them instead of waiting for a tool to cooperate. Use the Camera slide in Keynote to instantly show something on my webcam or phone, like a 3D printed object, large on the screen so everyone can see it clearly. Provide a webpage or document with all the ideas and resources so attendees have something to reference later.
After all these years, I’m still learning new tricks and inventing new ones. Lately I’ve been on a vibe coding kick, building things like customized name pickers and an applause bracket where the audience votes by making noise for their favorite tool or idea. For me, presenting is a lot like teaching. I’m always experimenting, refining, and looking for small ways to make the experience clearer, smoother, and more memorable.
|
|
At the end of February, Google released Nano Banana Version 2, the image generator built into the Gemini chatbot at gemini.google.com. The new version generates images faster and does a better job rendering text inside images. It also has what Google calls “advanced world knowledge,” meaning it can pull in information and data from the web. These improvements make it particularly good for creating things like infographics. Another improvement I appreciate is better control over image size and aspect ratio. For example, if an image is for a slide or video, I’ll request 16:9 (1920×1080). If I’m making an app icon, I’ll ask for a square image. Version 2 is much more likely to follow those size requests. Google also released an updated Ultimate Prompting Guide for Nano Banana. Here are a few tips from the guide that stood out to me: Use quotes. Put exact wording in quotation marks so the text appears correctly in the image. Use a character reference. Upload an image of a character or mascot to keep it consistent across multiple images. Use the text-first approach. Ask Gemini to draft the text first, then generate the image using that text. Switch to Thinking mode. Use Gemini’s Thinking mode instead of Fast for detailed visuals and layouts. Be precise. When editing an image, clearly state what should stay the same.
To create the infographic below, I first asked Gemini to draft the text based on an article about Nano Banana prompting. After refining the text, I asked Gemini to generate a widescreen 16:9 infographic that looks like a magazine spread. You’ll notice a few mistakes and odd bits of text in the infographic. Cleaning those up usually takes a few follow-up prompts. Another option is to fix the issues using Magic Studio in Canva.
|
|
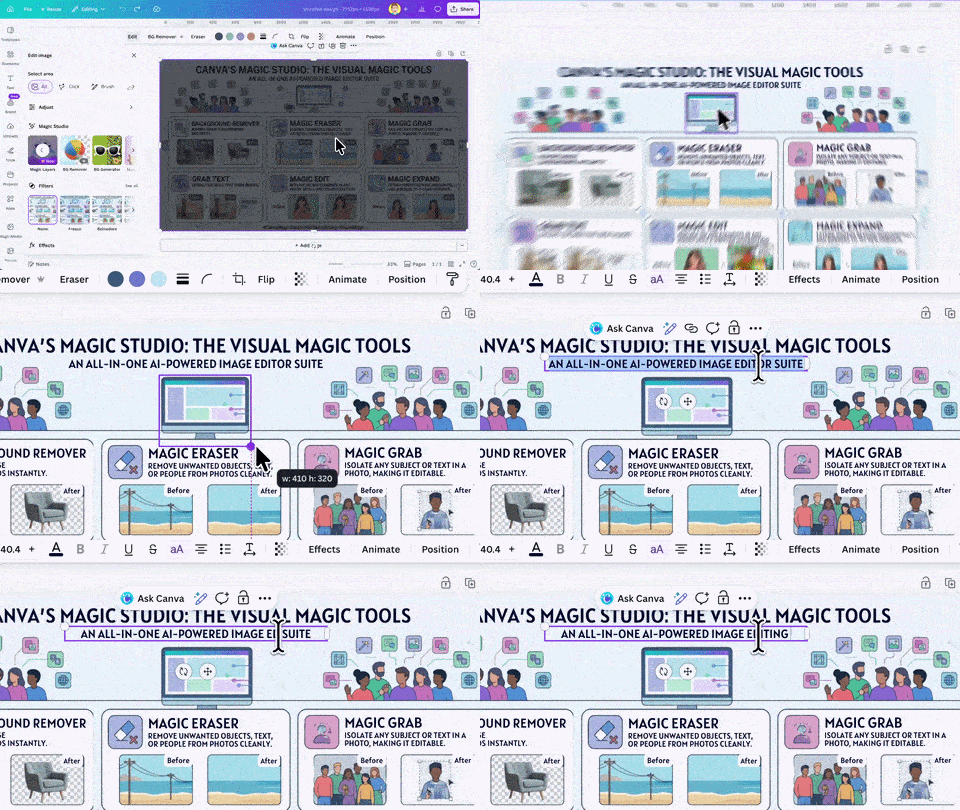
Sometimes I generate an image with AI and it’s almost perfect. Maybe a word is misspelled, a color is wrong, or something is slightly out of place. Asking the AI to fix it rarely works well. Either it changes the entire image or it changes nothing at all. Gemini and ChatGPT have improved their image generators, but they still struggle to edit their own output. That’s why I often turn to Canva’s Magic Studio tools when editing AI images. Tools like Background Remover, Magic Eraser, Magic Grab, Grab Text, Magic Edit, and Magic Expand have been my secret weapons. Now Canva has introduced a new option: Magic Layers. Magic Layers analyzes an image and turns it into editable layers inside Canva. Instead of one flat picture, the design becomes something you can tweak piece by piece. Here’s what Magic Layers can do: Separate objects and elements so you can move or resize them individually Convert text in the image into editable text boxes (with a best-guess font match) Preserve the original layout so the design still holds together Work with PNG or JPG images, including AI-generated images
Magic Layers also tries to reconstruct what’s behind objects. So if you move something, Canva fills in the space left behind, similar to how Magic Grab works. It’s not just for AI images. Magic Layers works with most PNG and JPG images you upload to Canva. You’ll get the best results with graphic designs, posters, and illustrations. Photo-realistic images may not separate as cleanly. Canva is presenting Magic Layers as a brand-new feature. And while it is new, it also feels like a smart combination of several Magic Studio tools we’ve had for a few years, now working together in one step.
|
|
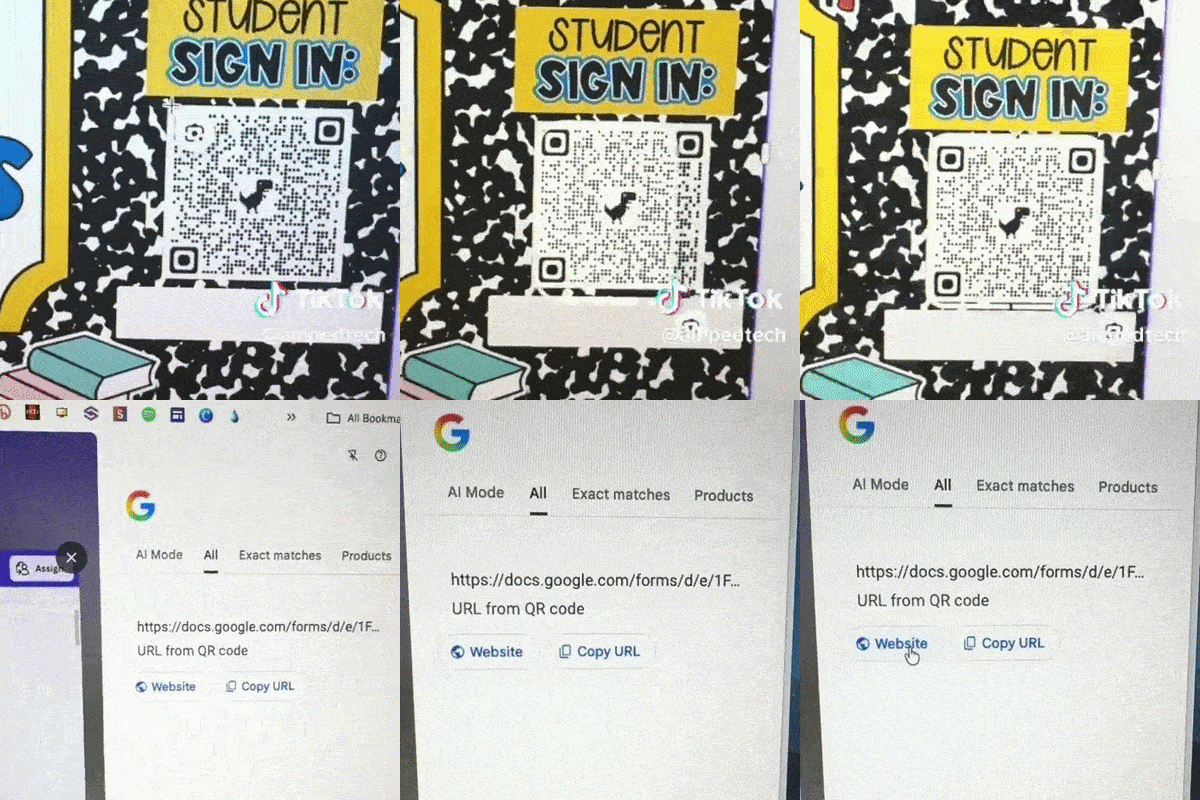
This tip comes from Ana Maria Perez, who shared it in a TikTok video. She shows how to scan a QR code directly from your computer using Google Lens in Chrome. Most of us think of QR codes as something you scan with a phone. But if the QR code is already on your screen, like in a slide, PDF, or website, Chrome can decode it for you. First, make sure the Google Lens button is visible in your Chrome toolbar. Open a new tab in Chrome. In the bottom-right corner, click Customize Chrome. Turn on the Google Lens button so it appears in the toolbar.
Once the Lens icon is visible, scanning a QR code is easy: Click the Google Lens icon in the Chrome toolbar. Your screen will dim and you can drag to select the QR code on the page. Google Lens analyzes the image and shows the link or information inside the QR code. Click the link to open it.
|
|
This works on Chromebooks, Windows PCs, and Macs using Chrome, so students can do this on their school computers without needing a phone. Why this is useful in classrooms: Students can open QR codes from slides, PDFs, or websites without using a phone. Teachers can quickly test QR codes while building lessons. Helpful when phones aren’t allowed in class. Works with screenshots or images that contain QR codes.
If a QR code appears in a Google Slide, digital worksheet, or LMS page, students and teachers can simply use Google Lens in Chrome to decode it. It’s a handy trick that makes on-screen QR codes much more practical. No phone needed and no jumping between devices.
|
|
My 7th grade daughter knows I love to vibe code educational apps. When she had a social studies quiz on the 50 states, she asked if I could make a game to help her study. Using Gemini, I built a simple app called Map Tap in about 45 minutes. In the game, you tap the correct state on a map. Behind the scenes, the app keeps track of states you miss and shows them more often for practice. It also stores high scores locally in the browser so players can try to beat their personal best. A little later my daughter asked if I could make another game for state capitals. Instead of creating a second app, I added a Capitals mode to Map Tap. Word spread quickly around her middle school, and many of her classmates started using it to study. It’s fun to see how quickly a simple tool can spread when students find it genuinely helpful. One of the things I love about vibe coding is how quickly you can create custom learning tools for a specific need. In this case, it turned a study task into a quick game and maybe even earned me a cool-dad point.
|
|
App Hive is a place where teachers can publish and share the apps they code with AI. While I built my Map Tap game using Gemini, I copied the code into App Hive so it’s easy for students to use. Apps on App Hive don’t require a login and run without frames, headers, or branding around them. That also helps in schools where tools like Gemini or other AI chatbots are blocked. Since App Hive simply hosts the finished apps, it’s less likely to be restricted on school networks.
|
|
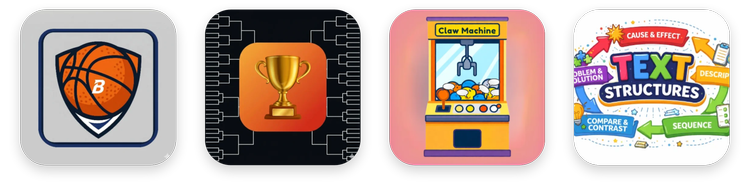
In the past week alone, a couple dozen new apps have been added. Here are a few that caught my eye: March Madness from Melissa Sullivan
Students solve a division problem and, if correct, get to shoot a basketball by clicking and dragging to aim and power up the shot. A fun fit for grades 3–5. Bracketology for Anything from Chad Laines
Turn almost any topic into a whole-class bracket debate. Chad even includes a teacher’s guide to help you set up and run the activity. Writing Prompt Claw Machine from Dan Gallagher
Designed for fourth graders, this app turns choosing a writing prompt into a colorful claw-machine game. Nonfiction Text Structures from Jill Hill
A visual breakdown of the five common informational text structures. Each includes a mental model, purpose, organization, and signal words.
What I love about App Hive is that many of the apps are ready to use right away. And browsing teacher-created apps can also spark ideas for vibe coding your own classroom tools.
|
|
Want Google search results without the AI Overview? Try adding -ai to your search query. Why remove AI Overviews from search? They can take away the chance to explore and synthesize information from multiple sources. The summaries can also be incomplete or occasionally incorrect. Teachers may even want to encourage students to use -ai when researching so they spend more time exploring websites and evaluating sources instead of relying on the AI summary to do the thinking for them. If you’d rather hide AI Overviews automatically, the browser extension Hide AI Overviews does exactly that. There are other ways to avoid the summaries. For example, adding &udm=14 to the end of a Google search URL forces Google to show the traditional list of links. But that’s not something most people want to type every time they search. So I built a simple web app called Blue Goo. Its tagline is: Don’t get stuck in the AI noise. Blue Goo sends your search to Google and returns the familiar list of blue links, without the AI Overview at the top. Bookmark it for when you want straightforward search results. It can also be a helpful tool for students.
|
|
There are also ways to disable AI Overviews through browser settings or Google Workspace admin controls, but the process is a bit complicated. If you’re curious, John Sowash has clear instructions and a helpful video explaining how.
|
|
If your school or organization is planning summer or fall professional learning, I’d love to work with your educators. Please pass my name along to anyone who organizes speakers or professional learning. I have openings on my calendar and would enjoy bringing great ideas to your teachers. You can explore my session topics and speaking options here. Smiles from Iowa,
|
|
Subscribe at learninginhand.com AI gave me a hand with brainstorming, drafting, and polishing this issue. Of course, I reviewed and adjusted everything before sharing it with you.
|
|
|
|