Harding Academy

December 3, 2013
KINDERGARTEN
Each kindergartner contributed three pages to a digital class book. The pages were made in the Book Creator app. The final product can be stored and read in the iBooks app.
- Book Creator Free allows for only one book.
- When creating a new book, be sure the whole class chooses the same book shape. You cannot merge books that are of different shapes. You cannot change the shape of a book after it’s created. We all chose Landscape.
- Each page can have an combination of photos, videos, drawings, text, and audio recordings.
- Collect student projects by sending the file to Bump. Do this by clicking the Share button in the student’s project in Book Creator and then scrolling through to find Open in Bump. Then Bump the file from the student iPad to the teacher iPad. After receiving each file on your iPad, click the name of the file and choose Open in Book Creator. Then return to Bump to repeat the process with the next student iPad.
- In order to merge books, the teacher must have the paid version of Book Creator.
- In Book Creator, make a new book. The cover of this book will be the cover of your collaborative book.
- It takes a little time to combine the books. You will click the + under the book with your cover to add the student pages. You’ll do this for each student project.
- After all is combined, you can send to the Dropbox app (which requires installation and account set up prior to this step). In Dropbox, copy the link to the .epub file. Paste that link into a QR code generator for student to scan. After students scan, they choose Open in iBooks.
- Tony will email you the link and QR code from Patti’s class after he has combined all student books together.
FIRST GRADE
First graders practiced counting coins in Explain Everything. They also recorded themselves showing others how to make a target number.
- Explain Everything is a paid app that is a whiteboard, drawing, and screencasting tool.
- Students can start from scratch of begin with a project the teacher has started. Use Dropbox to save to project on the teacher’s iPad in Explain Everything to Dropbox. Then copy the URL from Dropbox and paste into a QR code generator. Here is the URL for the coin file Tony had the first graders use: dropbox.com/s/zjzl4g15wjlbo91/coins.xpl
- Students save their final screen recordings to the Photo Library where they can be shared in a various ways like through the Apple TV, Padlet.com or DropItTo.me.
SECOND GRADE
Second graders learned how to draw a dog. They received a paper with a QR code to a video they can watch again to remind them how to draw the cartoon dog. They drew the dog in Hello Crayons and then used the photo in the day’s diary entry in the Kid’s Journal app.
- Tony found an .mp4 video file and shared it as a QR code. He shared the video with the help of Dropbox With Dropbox installed on a computer, you can make a folder and save a video right into that folder. When ready, right-click the video in the Dropbox folder and select Share Dropbox Link. You will have copied a URL that you can paste into a QR code generator to share with students.
- Tony used the free LiveSlide web-based service to mirror what he drew on a slide to each student device. You can sign up for a free account at liveslide.atlaslearning.net. You can then create a slide deck with a URL. Copy that URL and paste into a QR code generator as a quick way to get students to view your LiveSlide deck.
- Tony used this LiveSlide URL: http://liveslide.atlaslearning.net/join/5zt4s6h
- Student used the Hello Crayons app to draw a cartoon dog. You will want students to turn their volume all the way down for this app. A nice feature of Hello Crayons is that it has a bucket fill.
- Students save their finished drawing in Hello Crayons to the Photo Album. Then it can be imported into other apps.
- Kid’s Journal gives students a new page to complete each day. Each page can have an image (which can be what they have drawn in Hello Crayons or anything saved in the Photo Library). The page also has room for text and asks students to select icons to describe their day.
- Kid’s Journal entries can be exported to a PDF for printing, saving, and sharing.
THIRD GRADE
Third graders reviewed landforms by making 60 second documentaries using the Videolicious app.
- Tony gathered images of landforms and put them online in a gallery. He did this through Dropbox With Dropbox installed on a computer, you can make a folder and save images from the web right into that folder. When ready, right-click the folder and select Share Dropbox Link. You will have copied a URL that you can paste into a QR code generator to share with students.
- To save images from the Dropbox gallery on the web, students click the thumbnail image to see the larger version. Then they touch and hold until the Save Image option appears.
- When you start a Videolicious project, you can select the saved images. Then students record themselves while switching from the camera to the imported photos and the back to the camera. Videolicious has a 60 second time limit and you can see a countdown timer while you record.
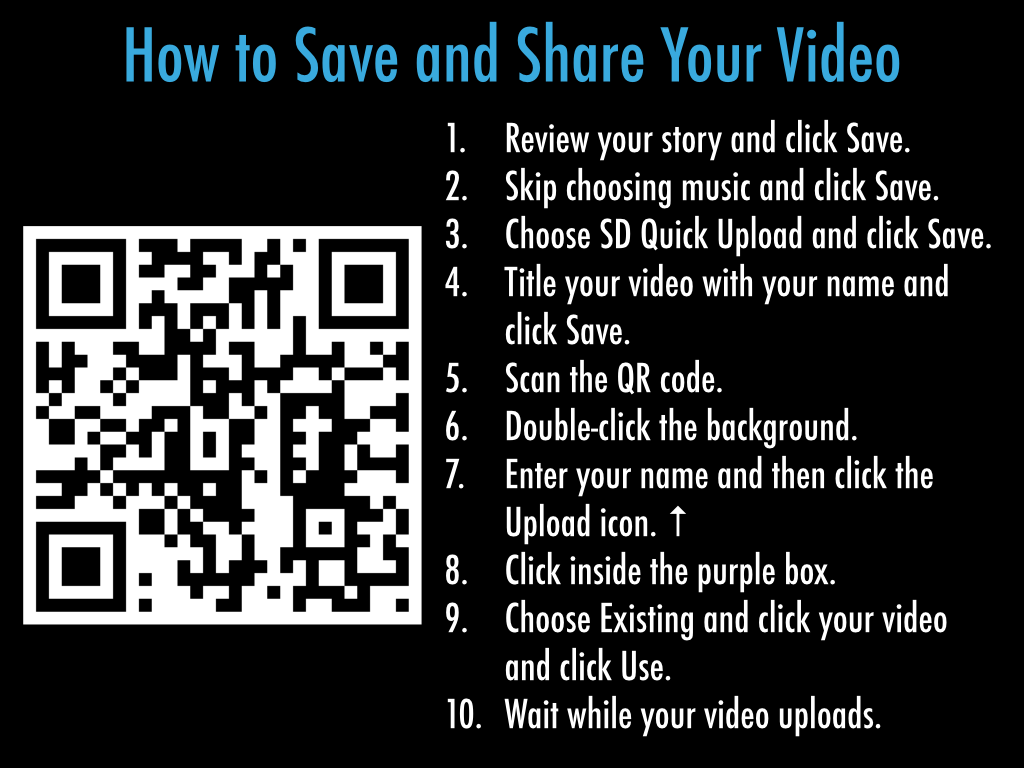
- Saving a Videolicious project copies the video to your Camera Roll where it can be shared. One way to share is through Padlet.
- Here is the slide Tony showed to help students save and share their videos on Padlet.
- Here is the Padlet wall where students shared their Videolicious projects: padlet.com/wall/landformsv
- Tony made a Quizlet set for students to play the Scatter game where they match pictures with landform types. It does require a Quizlet Pro ($15/year) or Teacher ($25/year) to include images in your Quizlet sets. Though, you can probably find a set already made by someone else by using Quizlet’s search.
- Download the PDF with the QR code for the Quizlet Landforms Scatter Game.
Making a new Padlet? Here are the settings Tony recommends:
- Log into Padlet.com.
- Click the Modify Wall button.
- Under profile, give your wall a title and description.
- Under Layout, change from Freeform to Stream.
- Under Privacy, checkmark Moderate posts.
- Under Address, give your wall an easy to type web address.
- See the QR code under the Share menu.
TEACHER Q and A FORUM
- Using Dropbox to share videos using a QR code
- Explain Everything User Guide in iBooks
- 30hands- Free app to attach audio to a series of photos. Then saves as a video file to the Camera Roll. You can edit off the ad for 30hands at the end by clicking Edit and Trim in the Photos app.
- Pic Collage - Make posters and save them to the Camera Roll. Then Share the photo as a wallpaper. This is great for vocabulary and other things you want students to remember!
- Venn Diagram - Simple app for making Venn diagrams.
- Easy Vote: Make a QR code that goes to http://easyvote.co.uk/rate/home.html
- Kids’ Journal - Free app that allows for a daily diary
- LiveSlide & Four Other Ways to Push Slide to Student iPads
March 25, 2013

Polls
- PollEverywhere.com
- Wordle.net for word clouds (doesn't work on iPad)
- WordItOut.com for word clouds (works on iPad)
Location & Photos = Yes! Allow!
otifications & Contacts = No! Don't Allow!
Images
- Skitch app
Collages
- Pic Collage app
isplay Your iPad on a Projector Screen
QR Codes
- Scan QR codes with i-nigma app
- Create QR codes at The QR Code Generator
- 75 Ways to Say Good Job QR Code Enabled Poster
- Want to make an audio QR Code? Record on your PC at recordmp3.org and paste that link into the QR Code generator.
- Brother Label/Sticker Printer
- Tony Vincent's video & resources about QR codes
Mind Mapping
Use Padlet to make an online wall where students can submit writing, images, and videos.
- nly the teacher needs a Padlet account.
- You may want to click Modify Wall after creating it. You can then give it a name, change the background, and choose Stream layout so that posts appear one below the other.
iOS Tips
Slideshows
- Haiku Deck for making simple and beautiful slideshows
- 30hands for making narrated slideshow that produces a video
Use Chirp to send links and and images to the whole class at once using sound. Students must have their Chirp open on their iPads to receive a chirp.
Animations
- Educreations app
- Explain Everything app (you received a code for a free download))
- Screencasting ideas Padlet
- PuppetPals HD
- View our PuppetPals movies we posted to Padlet.com!
Sign up for Dropbox and then sign up for Dropitto.me to make a webform for collecting videos that are saved into your Dropbox folder.
Graphic Organizers
- Click an organizer PDF at my.hrw.com/nsmedia/intgos/html/igo.htm
- With the PDF open, tap the Open In.. button and choose Adobe Reader
- Fill in the PDF in Adobe Reader. The filled in PDF can be emailed to the teacher.
Audio
- Croak.it allows you to record for up to 30 seconds and copy the URL of the audio.
- You can paste the URL into a Padlet, email, or anywhere you can paste text.
- Flipboard app for reading a personalize magazine
- #iosedapp
- #ipaded
- #ipadchat

Green Guardians offers free and premium lessons for K-5 students about environmental literacy.